
In crypto trading, price movements are driven by imbalances between buying and selling pressure. When demand exceeds supply, prices climb; when supply outweighs demand, prices drop. These reactions form supply and demand zones, key price areas where strong market orders have historically reversed or paused the trend.
Recognizing these zones allows traders to identify potential entry and exit levels before large price swings occur. A supply zone signals heavy selling interest and possible resistance, while a demand zone reflects concentrated buying pressure and potential support.
This guide explains how to identify and trade these zones using technical analysis, volume behavior, and confirmation indicators. You’ll also learn how BingX’s fast execution and advanced charting tools help traders act quickly and manage risk when trading around these critical levels.
What Are Supply and Demand Zones and How to Identify Them?
In crypto trading, supply and demand zones show where large buyers or sellers have influenced price. These levels reflect the imbalance between buying and selling pressure that drives future movements.
• Supply zone: where sellers dominate, creating resistance.
• Demand zone: where buyers step in, forming support.
These areas reveal trader psychology, profit-taking after rallies or accumulation near undervalued prices.
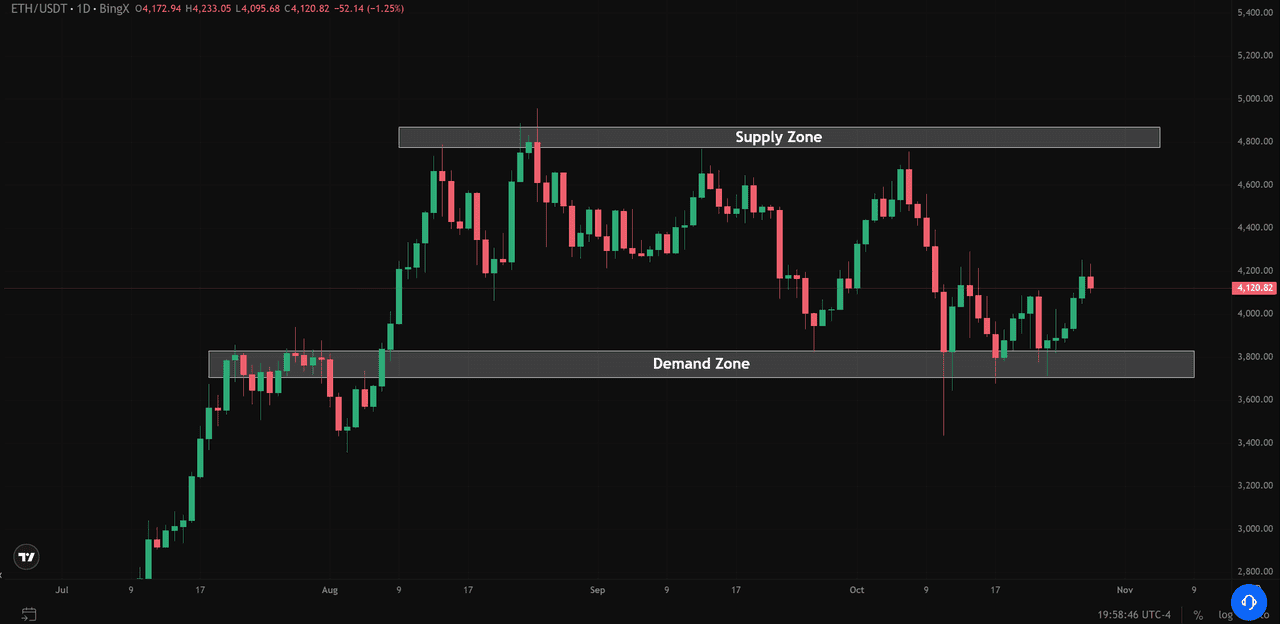
Ethereum (ETH/USD) Price Chart - Spurce: BingX
On charts, they often appear as:
• Rally-Base-Drop (Supply): price rises, pauses, then falls.
• Drop-Base-Rally (Demand): price drops, stabilizes, then rebounds.
How to Identify Supply and Demand Zones
1. Find sharp moves and the short base before them.
2. Mark the base’s high-low range as the zone.
3. Confirm with wicks, gaps, or high volume.
Zones on higher timeframes (4H or daily) are more reliable and help pinpoint reversal or continuation areas for precise trade planning.
How to Confirm Supply and Demand Zones with Technical Indicators
Technical indicators help validate supply and demand zones, reducing the risk of false entries. Using RSI and MACD together gives a clearer picture of momentum and potential reversals.
1. RSI – Identify Overbought and Oversold Levels
The Relative Strength Index (RSI) highlights when price may be stretched. Overbought near a supply zone: signals that buying momentum is fading and sellers could take control. Oversold near a demand zone: shows that selling pressure is weakening and buyers may soon step in.
• Overbought near $4,770: RSI readings above 65–70 signaled weakening buying pressure each time ETH approached the supply zone, often followed by short-term pullbacks.
• Oversold near $3,870: RSI dips toward 30 confirmed that selling momentum was fading around the demand zone, supporting long opportunities as buyers regained control.
For instance, in early October, RSI rebounded from 34 near the $3,870 zone, confirming strong buying interest before ETH bounced higher.
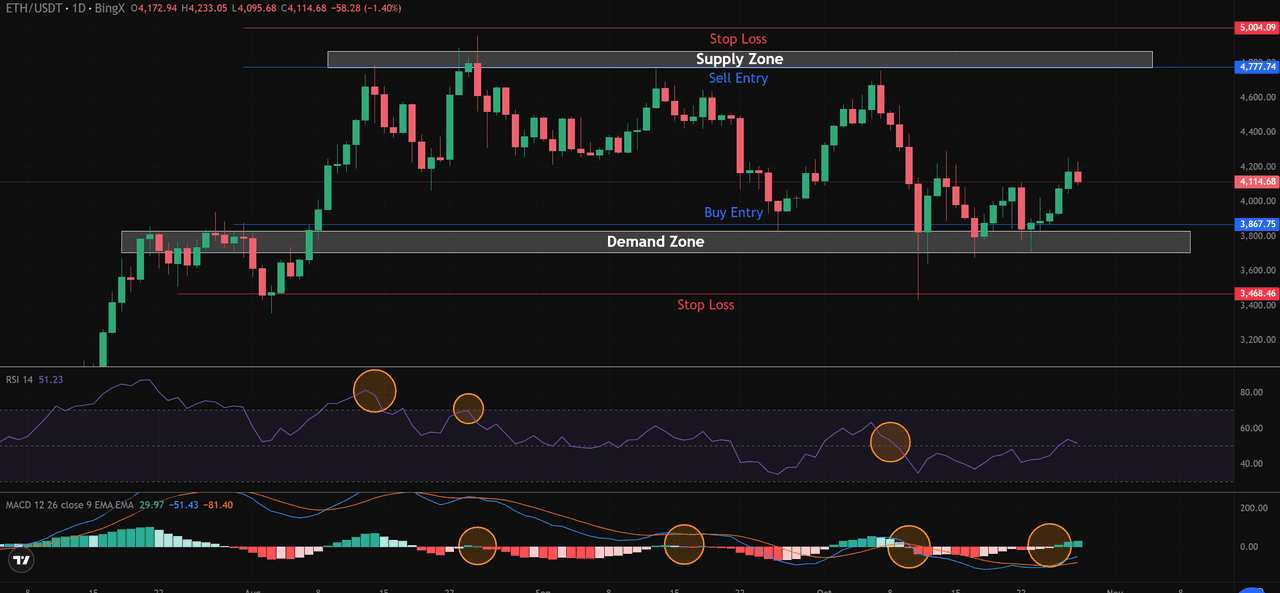
Ethereum (ETH/USD) Price Chart - Spurce: BingX
2. MACD – Spot Momentum Shifts Early
The Moving Average Convergence Divergence (MACD) helps confirm reversals by showing momentum changes before price fully reacts.
• A bearish crossover occurred near $4,770 in late August, just as price began retreating from the supply zone, confirming a short entry.
• A bullish crossover appeared near $3,870 in early October, coinciding with the demand zone rebound, supporting a buy setup.
These aligned signals, RSI oversold + MACD bullish crossover near demand, increased confidence in the reversal.
What Are the Different Types of Supply and Demand Zones?
Not all supply and demand zones behave the same way. Some trigger reversals, while others mark brief pauses before the trend resumes. Recognizing these differences helps traders anticipate how price might react when revisiting a zone.
1. Reversal Patterns
• Drop-Base-Rally (Bullish Reversal): Price declines sharply, stabilizes in a narrow base, then breaks upward. This pattern highlights a demand zone where buyers step in and shift control.
• Rally-Base-Drop (Bearish Reversal): Price rises, consolidates, then falls. This structure reveals a supply zone where selling pressure outweighs demand and triggers a downtrend.
2. Continuation Patterns
• Drop-Base-Drop: Price falls, pauses briefly, and continues downward. It shows sustained selling interest and a weak demand response.
• Rally-Base-Rally: Price climbs, forms a small consolidation, and continues higher, confirming ongoing buying pressure.
On a price chart, these patterns often appear as short consolidations between strong moves. Identifying whether the zone signals a reversal or continuation helps traders plan entries, stops, and profit targets more effectively.
How to Trade Crypto with Supply and Demand Zones: An Example
Let’s apply supply and demand analysis to a real chart, ETH/USDT on BingX. The chart highlights two critical areas: a supply zone near $4,770 and a demand zone around $3,870.
Sell Setup – Trading Below the Supply Zone
When price approaches a supply zone, selling pressure tends to increase as traders take profits or open short positions. In this example, ETH’s previous rallies repeatedly stalled near $4,770, confirming a strong resistance area.
• Sell Entry: Enter short trades once price shows rejection candles or bearish confirmation below the supply zone.
• Stop Loss: Place the stop just above the previous candle’s high or slightly above the upper boundary of the zone.
• Take Profit: Target nearby demand zones or prior swing lows, ideally before price hits strong buying interest.
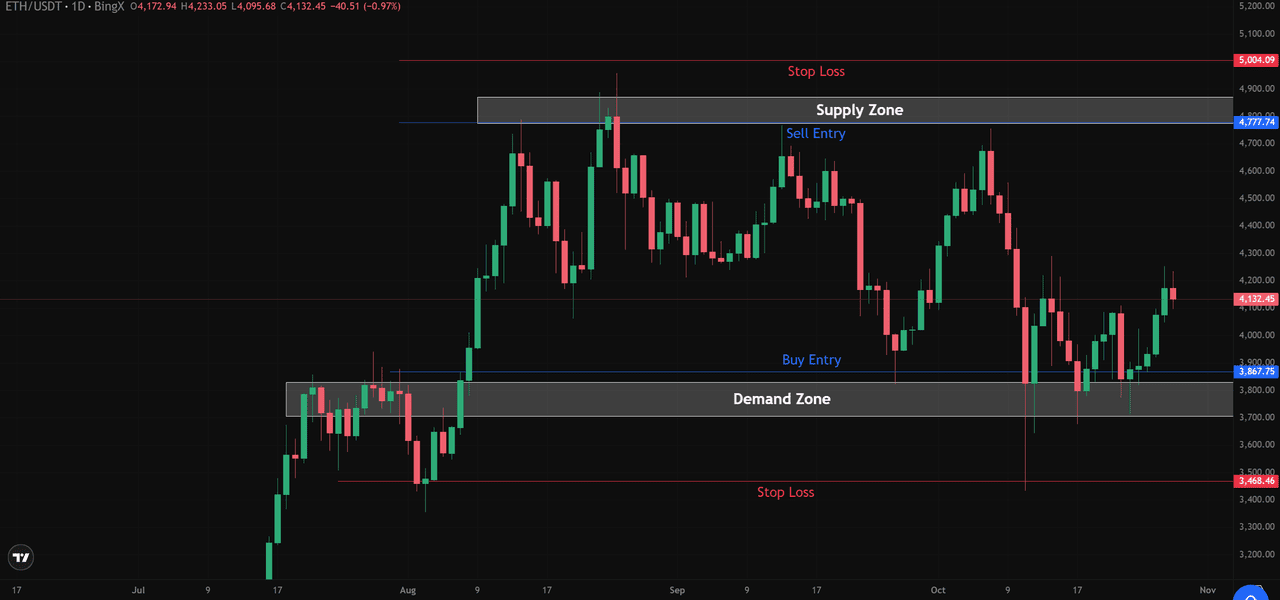
Ethereum (ETH/USD) Price Chart - Source: BingX
Buy Setup – Trading Above the Demand Zone
At the demand zone, around $3,870, buyers step in to accumulate positions. This zone represents a support level where selling pressure fades and demand increases.
• Buy Entry: Enter long positions when price forms bullish candles or closes back above the demand zone.
• Stop Loss: Place the stop just below the previous candle’s low or under the lower edge of the zone.
• Take Profit: Aim for nearby supply zones or prior resistance levels where selling might resume.
By aligning entries and exits with these zones, traders can manage risk more effectively while capturing high-probability price reactions. Combined with volume confirmation and RSI signals, supply and demand trading helps refine timing and improve consistency in volatile crypto markets.
What Are the Risks of Trading Supply and Demand Zones in Crypto?
Trading around supply and demand zones can be effective, but it’s not foolproof. Here are key risks and how to manage them:
1. False Breakouts: Price may break slightly above a supply zone or below a demand zone before reversing. Wait for confirmation, such as a candle closing beyond the zone or a clear volume spike, before entering.
2. News and Sentiment Shocks: Sudden policy changes, economic data, or large liquidations can disrupt technical setups. Always check market sentiment and avoid trading zones during major events.
3. Ignoring Fundamentals: Supply and demand zones show market behavior, not the full picture. Combine them with trend analysis, volume, or macro data to confirm strength.
Risk Management Tips when Trading Supply and Demand Zones
• You should risk only 1–2% of your total account balance per trade to preserve capital during volatile swings.
• Always set a stop-loss just beyond the zone’s high or low to prevent deeper losses if the market breaks through.
• Take partial profits as price approaches the next supply or demand zone to lock in gains and reduce exposure.
• Avoid overlapping or poorly defined zones on lower timeframes, since they can lead to indecisive entries and false signals.
A disciplined approach, with clear stops and modest position sizes, keeps losses small and protects capital for stronger setups.
Why Use BingX for Supply and Demand Trading
Trading crypto using supply and demand zones requires speed, precision, and reliable execution, all of which BingX provides. With spot trading fees starting at just 0.1%, ultra-fast order execution minimizes slippage around critical price levels, helping you capture optimal entries and exits. You can also test your setups safely in a demo trading environment, allowing you to refine your strategy before going live.
BingX enhances your edge with advanced charting tools, automated trading features, and real-time market signals tailored for zone-based strategies. Regular BTC and ETH market updates keep you informed about active supply and demand levels, while AI-powered insights help you manage risk more effectively. By combining low costs, smart analytics, and institutional-grade execution, BingX makes it easier for you to trade confidently and react faster around key market zones.
Conclusion: Turning Analysis into Action
Mastering supply and demand zones helps traders recognize where prices are likely to react, improving entry timing and trade management. Combining these zones with indicators such as volume, RSI, and moving averages adds confirmation and reduces false signals.
Consistent results come from discipline, waiting for clean setups, controlling risk, and keeping position sizes small. Every trade should follow a plan based on structure, not emotion.
Start practicing on BingX with demo trades, refine your strategy, and move to live trading once consistent. Join BingX today to trade smarter using supply and demand zone strategies.
Related Articles
5. Simple Moving Average(SMA) vs Exponential Moving Average(EMA) in Crypto Trading: Differences to Know
FAQ on Trading with Supply and Demand Zones
1. What are supply and demand zones in crypto trading?
Supply and demand zones are key price areas where large buy or sell orders previously caused strong moves. Supply zones act as resistance where sellers dominate, while demand zones act as support where buyers step in.
2. How do I find supply and demand zones on a chart?
Look for sharp price movements followed by a short consolidation. Mark the high and low of that base as the zone. Zones on higher timeframes, such as 4-hour or daily charts, are more reliable.
3. What technical indicators confirm supply and demand zones?
RSI and MACD work well for confirmation. Overbought RSI or a bearish MACD crossover near a supply zone signals potential selling pressure; oversold RSI or a bullish MACD crossover near a demand zone suggests buying interest.
4. Where should I set stop-loss and take-profit levels?
Place the stop-loss slightly beyond the zone’s boundary, above supply or below demand. Take profits as price approaches the next zone or key support/resistance level to lock in gains.
5. Can beginners trade using supply and demand zones?
Yes. Start with demo trading to practice identifying zones, drawing them accurately, and managing risk. BingX’s demo mode lets you test trades safely before moving to live markets.
