


Bridging to Hyperliquid in 2026 has become a friction-less experience, moving from a manual multi-step process to a near-instant one-click reality. Whether you are migrating from the deep liquidity of Arbitrum or the high-speed ecosystem of Solana, the goal remains the same: moving USDC into the Hyperliquid L1 to trade high-leverage perpetuals or participate in the burgeoning HyperEVM ecosystem.
In the 2026 DeFi landscape, Hyperliquid has solidified its position as a top-tier decentralized exchange (DEX), often rivaling centralized giants in volume. To tap into this liquidity, traders utilize a variety of intent-based bridges like Across Protocol and deBridge, which offer sub-second finality and near-zero fees. This guide provides a granular breakdown of the most efficient bridging routes, helping you navigate the choice between native deposits and third-party aggregators.
Why Bridging to Hyperliquid Requires a Strategic Approach
Unlike traditional Layer 2s that settle on Ethereum, Hyperliquid is a standalone Layer 1 blockchain powered by the HyperBFT consensus mechanism. This means that assets don't just move between networks; they are cryptographically locked on a source chain and minted as representative assets like USDH or uUSDC on Hyperliquid.
In 2026, the primary risk for traders is no longer speed, but path selection. Choosing an inefficient bridge can result in:
- Slippage: Losing 0.5%–1% of your principal on large transfers.
- Gas Bloat: Paying unnecessary convenience fees on top of base network costs.
- Layer Confusion: Sending funds to the HyperCore Trading Layer when you actually intended to use the HyperEVM Smart Contract Layer.
HyperCore Trading vs. HyperEVM: Know Your Destination
A common mistake in 2026 is sending funds to the wrong sub-layer within the Hyperliquid ecosystem.
- HyperCore (Main Layer): This is where the order book lives. Use this if your goal is to trade perpetuals or spot with gasless transactions. Most bridges default here.
- HyperEVM: This is the Ethereum-compatible layer for lending, yield farming dApps. If you are using a protocol like HyperLend, you must specifically select HyperEVM as the destination in your bridge interface.
Pro Tip: If you accidentally bridge to the Trading layer but need funds on HyperEVM, use the internal Transfer tool on the Hyperliquid dApp to move assets between layers instantly for zero cost.
What Are the Most Efficient Ways to Bridge to Hyperliquid in 2026?
The best route for bridging assets to Hyperliquid is defined by a balance of speed, cost, and the specific chain you are exiting. In 2026, Across Protocol and deBridge have emerged as the gold standards for Arbitrum and Solana users, respectively.
|
Method |
Avg. Time |
Best For |
Total Est. Cost |
|
Across (Arbitrum Path) |
2 Seconds |
High-volume USDC transfers |
$0 fee + Gas |
|
deBridge (Solana Path) |
30 Seconds |
Solana-native users |
0.05 WHYPE flat fee |
|
Native Arbitrum Bridge |
1–3 Minutes |
Maximum security/Official route |
Variable (Gas only) |
|
Bridge Aggregators (Jumper) |
Variable |
Comparing routes for exotic tokens |
0.1% - 0.3% |
1. Bridging from Arbitrum to Hyperliquid: The Zero-Fee Intent Route
For the majority of traders, Arbitrum One is the primary launchpad for Hyperliquid due to its native USDC integration. In 2026, Across utilizes fillers who provide immediate liquidity on Hyperliquid in exchange for your USDC on Arbitrum. This intent-based model often results in $0 protocol fees for standard USDC transfers.
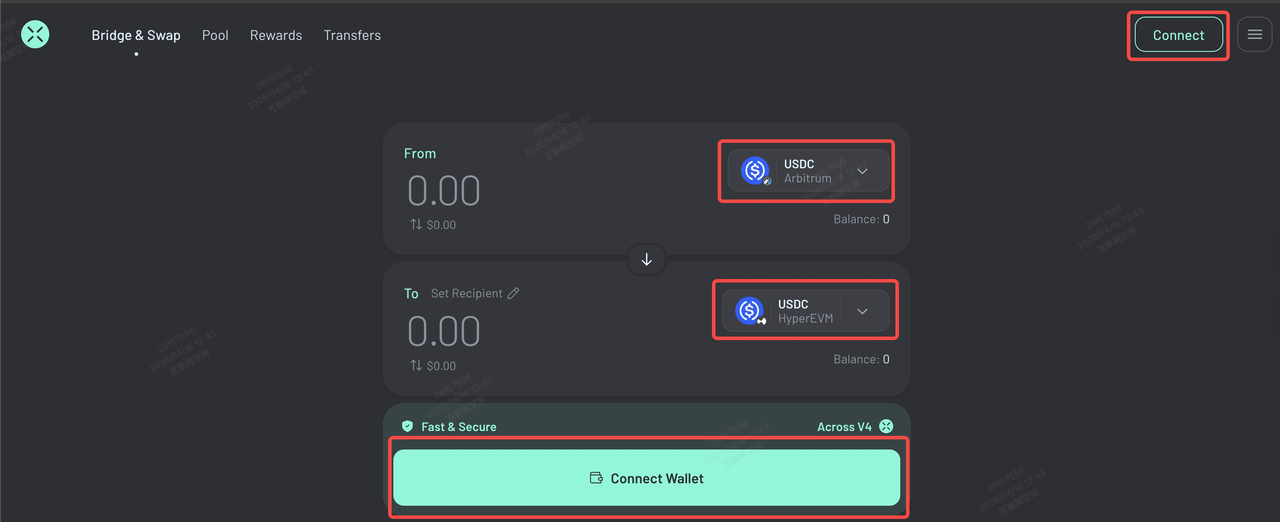
How to Bridge From Arbitrum to Hyperliquid with Across Protocol
To bridge from Arbitrum, start by withdrawing ETH or USDC from BingX to your Rabby Wallet via the Arbitrum One network to ensure you have the necessary assets and gas for the transaction.
- Fund Your Wallet via BingX: Before you can bridge, you need assets in your source wallet. The most efficient way to start is by buying ETH or USDC on BingX. Once purchased, withdraw your funds to your EVM-compatible wallet like Rabby using the Arbitrum One network.
This route is preferred because withdrawal fees from BingX to Arbitrum are significantly lower than withdrawing to the Ethereum Mainnet, and the transaction is typically processed in under 2 minutes. - Connect to Across Protocol: Once your assets arrive in your wallet, navigate to the Across Protocol dApp. Click Connect Wallet and select Rabby Wallet or your preferred EVM-compatible provider.
Note: Rabby is highly recommended for Hyperliquid users as it provides clear security pop-ups that detail exactly what permissions you are granting to the bridge. - Set Your Route from Arbitrum to Hyperliquid: In the Across interface, you must define the Source and Destination chains.
- Source: Select Arbitrum.
- Destination: Select Hyperliquid.
- Network Check: Across will automatically prompt you to switch your wallet to the Arbitrum network if you aren't already on it. This ensures you are pulling funds from the correct chain.
- Source: Select Arbitrum.
- Select the Asset (USDC): Hyperliquid is primarily a USDC-denominated platform. Select USDC from the asset dropdown menu.
Since Across uses an intent-based model, it can often settle USDC transfers with near-zero slippage. Ensure you are sending Native USDC for the smoothest compatibility with the Hyperliquid L1. - Finalize the Transaction: Review the Fill Fee and the estimated time of arrival. Click Confirm and sign the transaction in your Rabby extension.
Because Across utilizes a network of liquidity fillers rather than waiting for traditional L2-to-L1 settlement times, your funds typically arrive on Hyperliquid in under 5 seconds. You can then immediately head to the Hyperliquid dApp to begin trading.
2. Bridging from Solana to Hyperliquid: The deBridge High-Speed Path
As Solana's ecosystem continues to dominate retail trading in 2026, the Solana-to-Hyperliquid bridge is a high-traffic route. deBridge remains the most reliable provider for this cross-ecosystem move. deBridge bypasses the need for a middleman chain like Ethereum, moving USDC directly from a Solana (0x...) address to a Hyperliquid-compatible EVM address.
How to Bridge to Hyperliquid from Solana with deBridge
To bridge from Solana, ensure you have USDC and a small amount of SOL for gas in your wallet by purchasing them on BingX and withdrawing them to your Solana address.
- Open Your Wallet: Launch your Phantom or Backpack wallet extension and ensure you are connected to the Solana mainnet.
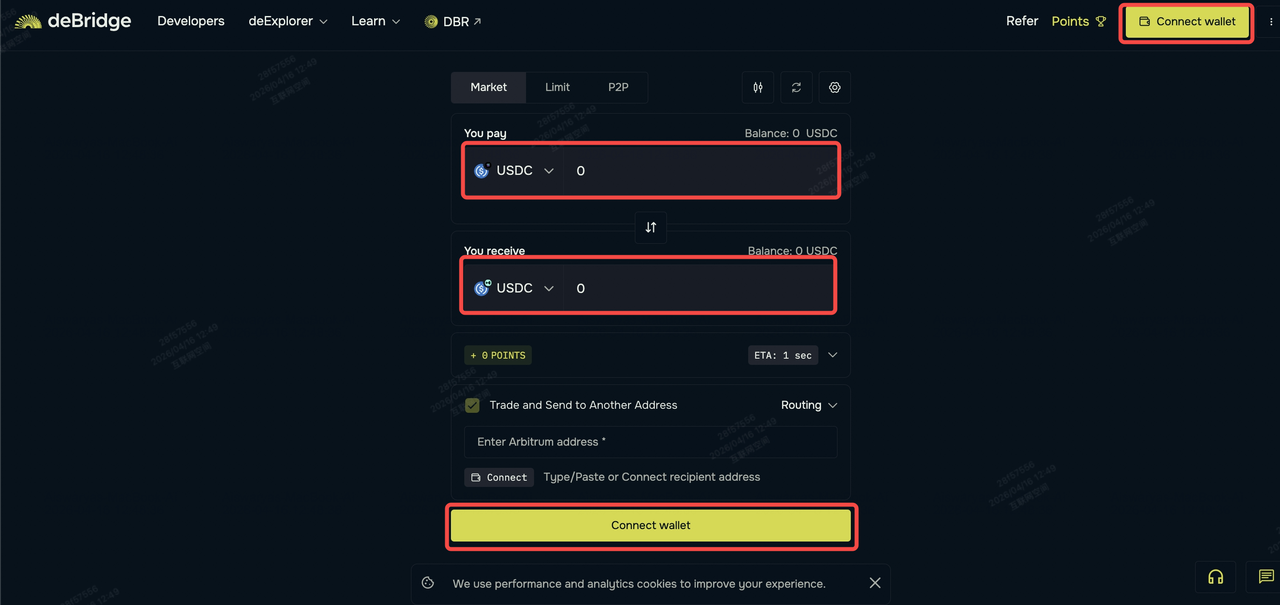
- Connect to deBridge: Visit the deBridge dApp and select Solana as your source chain and Hyperliquid as your destination.
- Enter Amount: Input the amount of USDC you wish to transfer; the interface will automatically calculate the bridge fee and the estimated amount to be received on Hyperliquid.
- Verify Destination: Confirm that your receiving address is correct; since Hyperliquid is EVM-compatible, this will be your standard 0x wallet address.
- Finalize the Bridge: Click Bridge and sign the transaction in your wallet; your funds will typically appear on the Hyperliquid DEX in approximately 30 seconds.
How to Deposit Assets and Start Your First Trade on Hyperliquid DEX
Once your assets have been bridged, follow these steps to activate your Hyperliquid trading account:
Step 1: Connect and Initialize
Navigate to the official Hyperliquid dApp. Connect your Rabby or MetaMask wallet. You will be prompted to Enable Trading; this creates your local signing key so you don't have to sign every individual trade.
Step 2: Verify the Deposit
Go to the Portfolio tab. Under Balances, you should see your bridged USDC (often listed as USDH). Unlike CEXs, there is no internal transfer required to start trading; your deposit is immediately available as margin.
Step 3: Manage Gas on HyperEVM
If you are interacting with the HyperEVM layer, remember that gas is paid in HYPE, not ETH. You can acquire HYPE directly on BingX or on the Hyperliquid Spot market once your USDC arrives.
Final Thoughts: Staying Secure in the 2026 DeFi Market
The connectivity between Arbitrum, Solana, and Hyperliquid has evolved into a high-speed financial highway, offering traders unprecedented efficiency. By utilizing intent-based bridges like Across or high-performance pipelines like deBridge, users can minimize slippage and ensure their capital is deployed effectively on the market's most liquid perpetual DEX. However, the move toward near-instant transactions does not eliminate the responsibilities of self-custody; maintaining security remains a proactive task that requires constant vigilance.
To ensure long-term capital preservation, always verify that you are interacting with official URLs of Hyperliquid, Across Protocol, and deBridge, to avoid increasingly sophisticated phishing clones. It is highly recommended to perform a small test transaction before moving significant capital and to use hardware wallets for long-term asset storage. As the DeFi ecosystem grows more complex, the most successful traders will be those who balance the pursuit of high-performance execution with rigorous security protocols.
Risk Reminder: Digital asset prices are subject to high market risk and price volatility. Perpetual trading involves high leverage and a significant risk of total capital loss. Always perform your own due diligence and never trade with funds you cannot afford to lose.
Related Reading
- What Is Hyperliquid (HYPE) Decentralized Perpetual Exchange: A Complete Guide
- Hyperliquid (HYPE) Price Prediction 2026: The $150 Revenue Thesis vs. The $40 Baseline
- Aster vs. Hyperliquid: Which One Will Lead the Perpertual DEX Market in 2026?
- What Are the Top Perp DEXs (Perpetual DEXs) to Know in 2026?
- How to Bridge Ethereum to Solana (2026 Guide)
FAQs on Hyperliquid Bridging
1. What is the minimum deposit for Hyperliquid?
The native bridge usually requires a 5 USDC minimum. Third-party bridges like Across may have their own minimums, typically around $10.
2. Is there a withdrawal period when bridging between Arbitrum and Hyperliquid?
Native Arbitrum withdrawals typically take 3–4 minutes. If you use a fast bridge like Across to exit, the process can be as short as 10 seconds.
3. Why hasn't my Solana bridge transaction appeared on Hyperliquid yet?
Check your Solana wallet for a Claim requirement. Some older bridge models require you to manually claim the funds on the destination chain once the source transaction is finalized.